Ceph uses RADOS (Reliable Autonomic Distributed Object Store) as its underlying storage system, which means it’s a object storage at its core.
Up to this point, I’ve only been using it as a block storage (Ceph RBD) and a filesystem (CephFS). At times, I have done things like running a MinIO server on top of Ceph RBD to provide S3 compatible object storage, which is an abomination of object storage -> block storage - > object storage.
It’s time to end that ritual and provide a proper object storage using Ceph RGW (RADOS Gateway).
Environment
- OS: Proxmox VE 8.4.14
- Ceph: 19.2.3 Squid, installed via Proxmox APT repository
- Kubernetes: v1.33.4+k3s1
- HAProxy (to be deployed): haproxy:bookworm
Spin up Ceph RGW
I chose to deploy Ceph RGW on two of my Proxmox nodes to provide minimal HA.
Node info:
| Name |
IP |
| opx02 |
10.0.69.3 |
| opx04 |
10.0.69.5 |
Setting up opx02 in this section.
Packages
On the first RGW node,
1
|
apt update && apt install radosgw
|
Create RGW pools
There are several pools that need to be created for RGW to run, similar to CephFS.
 1
 2
 3
 4
 5
 6
 7
 8
 9
10
11
12
13
14
15
|
# Create the required pools for RGW
ceph osd pool create rgw-root 8
ceph osd pool create default.rgw.control 8
ceph osd pool create default.rgw.meta 8
ceph osd pool create default.rgw.log 8
ceph osd pool create default.rgw.buckets.index 16
ceph osd pool create default.rgw.buckets.data 32

# Set application type
ceph osd pool application enable rgw-root rgw
ceph osd pool application enable default.rgw.control rgw
ceph osd pool application enable default.rgw.meta rgw
ceph osd pool application enable default.rgw.log rgw
ceph osd pool application enable default.rgw.buckets.index rgw
ceph osd pool application enable default.rgw.buckets.data rgw
|
Since I won’t be storing huge amount of data in RGW, I kept the PG count on the lower side. This can be adjusted later based on usage.
Some specific application types are set for each pool to optimize them for RGW usage.
These pools are named following the default naming convention. They will be automatically picked up by RGW when the default realm and zonegroup are used, which is what I did.
Add following to /etc/ceph/ceph.conf on one of the nodes that will run RGW:
1
2
3
4
5
6
|
[client.rgw.opx02]
host = opx02
keyring = /var/lib/ceph/radosgw/ceph-rgw.opx02/keyring
log file = /var/log/ceph/ceph-rgw-opx02.log
rgw frontends = beast port=7480
rgw thread pool size = 128
|
The updated file will be synced to other nodes automatically by Proxmox (with Corosync).
Create RGW keyring
RGW needs its own keyring.
1
2
3
4
5
6
7
8
9
|
# create config key dir for radosgw
mkdir -p /var/lib/ceph/radosgw/ceph-rgw.$(hostname)
chown -R ceph:ceph /var/lib/ceph/radosgw/

# Create the keyring
ceph auth get-or-create client.rgw.$(hostname) \
    osd 'allow rwx' \
    mon 'allow rw' \
    -o /var/lib/ceph/radosgw/ceph-rgw.$(hostname)/keyring
|
Start RGW service
It’s finally time to start the RGW service.
1
2
|
systemctl enable --now ceph-radosgw@rgw.$(hostname)
systemctl status ceph-radosgw@rgw.$(hostname)
|
Create admin user
RGW is now running, but an admin user is needed to manage it.
 1
 2
 3
 4
 5
 6
 7
 8
 9
10
11
12
13
|
# Remove the existing user (if exists)
# radosgw-admin user rm --uid=admin

# Create admin user with system flag
radosgw-admin user create \
    --uid=admin \
    --display-name="admin" \
    --system

# Grant full capabilities to admin user
radosgw-admin caps add \
    --uid=admin \
    --caps="users=*;buckets=*;metadata=*;usage=*;zone=*"
|
The admin user created here has:
system flag, which allows it to perform system-level operations such as managing other users and buckets.- Full capabilities on users, buckets, metadata, usage, and zone.
Retrieve the access and secret keys for the admin user:
1
2
|
radosgw-admin metadata list user
radosgw-admin user info --uid=admin
|
realm/zonegroup/zone setup
Same as Amazon S3, Ceph RGW uses the concept of realm, zonegroup, and zone to organize its resources.
Since I don’t have any plans to go multi-site, I just set up a single default realm, zonegroup, and zone.
 1
 2
 3
 4
 5
 6
 7
 8
 9
10
11
12
13
14
15
16
17
|
# Delete existing zone and zonegroup
# radosgw-admin zone delete --rgw-zone=default
# radosgw-admin zonegroup delete --rgw-zonegroup=default

# Create realm, zonegroup, and zone
radosgw-admin zonegroup create --rgw-realm=default --rgw-zonegroup=default --master --default
radosgw-admin zone create --rgw-realm=default --rgw-zonegroup=default --rgw-zone=default --master --default

# Set the zone as default
radosgw-admin zonegroup default --rgw-zonegroup=default
radosgw-admin zone default --rgw-zone=default

# Commit changes
radosgw-admin period update --commit

# Restart RGW to apply
systemctl restart ceph-radosgw@rgw.$(hostname)
|
In some cases RGW complains when committing chanes. Force commit might help:
1
|
radosgw-admin period update --commit --yes-i-really-mean-it
|
Testing
To do a quick test, I used s3cmd to interact with the RGW server.
Create a config file at ~/.s3cfg with following content:
1
2
3
4
5
6
|
[default]
access_key = <your-access-key>
secret_key = <your-secret-key>
host_base = <rgw-server-ip>:7480
host_bucket =
use_https = False
|
This can also be generated with s3cmd --configure, but I prefer to create it manually since the generated config contains some unnecessary options such as CloudFront settings.
 1
 2
 3
 4
 5
 6
 7
 8
 9
10
11
12
13
14
15
16
17
18
19
20
|
# List buckets (should be empty initially)
s3cmd ls
# Create a new bucket
s3cmd mb s3://my-first-bucket
# List buckets again
s3cmd ls
# Upload a file
s3cmd put myfile.txt s3://my-first-bucket/
# List files in the bucket
s3cmd ls s3://my-first-bucket/
# Download the file
s3cmd get s3://my-first-bucket/myfile.txt downloadedfile.txt
# Verify the downloaded file
cat downloadedfile.txt
# Delete the file from bucket
s3cmd del s3://my-first-bucket/myfile.txt
# Remove the bucket
s3cmd rb s3://my-first-bucket
# Confirm it's gone
s3cmd ls
|
Setting up another node
On opx04,
1
|
apt update && apt install radosgw
|
It also needs its own keyring.
 1
 2
 3
 4
 5
 6
 7
 8
 9
10
11
|
# Create directory
mkdir -p /var/lib/ceph/radosgw/ceph-rgw.opx04

# Create keyring
ceph auth get-or-create client.rgw.opx04 \
    osd 'allow rwx' \
    mon 'allow rw' \
    -o /var/lib/ceph/radosgw/ceph-rgw.opx04/keyring

# Set permissions
chown -R ceph:ceph /var/lib/ceph/radosgw/
|
Add to /etc/ceph/ceph.conf (can be done from any node):
1
2
3
4
5
6
7
8
9
|
[client.rgw.opx04]
host = opx04
keyring = /var/lib/ceph/radosgw/ceph-rgw.opx04/keyring
log file = /var/log/ceph/ceph-rgw-opx04.log
rgw frontends = beast port=7480
rgw thread pool size = 128
rgw_realm = default
rgw_zonegroup = default
rgw_zone = default
|
Launch RGW services on opx04 as well:
1
2
|
systemctl enable --now ceph-radosgw@rgw.$(hostname)
systemctl status ceph-radosgw@rgw.$(hostname)
|
Quick test:
1
|
curl http://localhost:7480
|
Load balancing using HAProxy
Having two RGW nodes does not mean HA, yet. There needs to be a load balancer. I chose HAProxy again for this task, as I did for Proxmox web UI and Ceph dashboard.
To simplify things, I decided to load balance RGW and Ceph dashboard with the same HAProxy deployment on my Kubernetes cluster.
configmap.yml
 1
 2
 3
 4
 5
 6
 7
 8
 9
10
11
12
13
14
15
16
17
18
19
20
21
22
23
24
25
26
27
28
29
30
31
32
33
34
35
36
37
38
39
40
41
42
|
apiVersion: v1
kind: ConfigMap
metadata:
  name: ceph-proxy
  namespace: network
data:
  haproxy.cfg: |
    global
        stats timeout 30s

    defaults
        log    global
        mode    http
        option    httplog
        option    dontlognull
        timeout connect 5000
        timeout client  50000
        timeout server  50000

    frontend webfront
        bind *:80
        mode http
        option tcplog
        default_backend webback

    backend webback
        mode http
        balance source
        server amd01 10.0.69.9:8080 check
        server opx03 10.0.69.4:8080 check

    frontend rgwfront
        bind *:7480
        mode http
        option tcplog
        default_backend rgwback

    backend rgwback
        mode http
        balance source
        server opx02 10.0.69.3:7480 check
        server opx04 10.0.69.5:7480 check
|
deployment.yml
 1
 2
 3
 4
 5
 6
 7
 8
 9
10
11
12
13
14
15
16
17
18
19
20
21
22
23
24
25
26
27
28
29
30
31
|
apiVersion: apps/v1
kind: Deployment
metadata:
  name: ceph-proxy
  namespace: network
  labels:
    app: ceph-proxy
spec:
  replicas: 2
  selector:
    matchLabels:
      app: ceph-proxy
  template:
    metadata:
      labels:
        app: ceph-proxy
    spec:
      containers:
        - name: ceph-proxy
          image: haproxy:bookworm
          ports:
            - containerPort: 80
            - containerPort: 7480
          volumeMounts:
            - name: config-volume
              mountPath: /usr/local/etc/haproxy/haproxy.cfg
              subPath: haproxy.cfg
      volumes:
        - name: config-volume
          configMap:
            name: ceph-proxy
|
service.yml
 1
 2
 3
 4
 5
 6
 7
 8
 9
10
11
12
13
14
15
16
17
|
apiVersion: v1
kind: Service
metadata:
  name: ceph-proxy
  namespace: network
spec:
  ports:
    - name: http
      protocol: TCP
      port: 80
      targetPort: 80
    - name: rgw
      protocol: TCP
      port: 7480
      targetPort: 7480
  selector:
    app: ceph-proxy
|
For external access, I created an Ingress with a valid TLS certificate, so that I can access RGW via https://rgw.i.junyi.me.
ingress.yml
 1
 2
 3
 4
 5
 6
 7
 8
 9
10
11
12
13
14
15
16
17
18
19
20
21
22
23
24
|
apiVersion: networking.k8s.io/v1
kind: Ingress
metadata:
  name: ceph-rgw
  namespace: network
  annotations:
    traefik.ingress.kubernetes.io/router.entrypoints: internal, internalsecure
spec:
  ingressClassName: traefik
  rules:
    - host: rgw.i.junyi.me
      http:
        paths:
        - path: /
          pathType: Prefix
          backend:
            service:
              name: ceph-proxy
              port:
                number: 7480
  tls:
    - hosts:
        - "*.i.junyi.me"
      secretName: junyi-me-production
|
Testing with load balancer
To test the new setup with load balancer, I updated the ~/.s3cfg file as follows:
1
2
3
4
5
6
|
[default]
access_key = <your-access-key>
secret_key = <your-secret-key>
host_base = rgw.i.junyi.me
host_bucket =
use_https = True
|
And ran the same commands again:
 1
 2
 3
 4
 5
 6
 7
 8
 9
10
11
12
13
14
15
16
17
18
19
20
|
# List buckets (should be empty initially)
s3cmd ls
# Create a new bucket
s3cmd mb s3://my-first-bucket
# List buckets again
s3cmd ls
# Upload a file
s3cmd put myfile.txt s3://my-first-bucket/
# List files in the bucket
s3cmd ls s3://my-first-bucket/
# Download the file
s3cmd get s3://my-first-bucket/myfile.txt downloadedfile.txt
# Verify the downloaded file
cat downloadedfile.txt
# Delete the file from bucket
s3cmd del s3://my-first-bucket/myfile.txt
# Remove the bucket
s3cmd rb s3://my-first-bucket
# Confirm it's gone
s3cmd ls
|
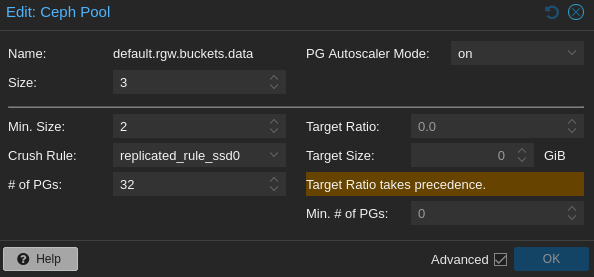
Storage class
As for any other Ceph storage, RGW is backed by Ceph pools. So, changing the underlying storage class (e.g. CRUSH rule) is pretty straightforward. I usually do it on Proxmox web console.
In my case, since I plan to use it for smaller files (mainly gitlab repo files and container images), I chose to store everything on SSDs.
Conclusion
I had alawys thought setting up Ceph RGW would be such a pain, and I have procrastinated doing it for a long time. It turns out, at least for a basic setup, it’s not that bad.
This is a pretty basic setup without some features like storage policies, lifecycle management, etc., but it suits my needs for now.
Now I can finally point my gitlab instance to this RGW instead of MinIO on top of RBD.
My current method of backup for gitlab is very awkward, involving saving the backup tar in MinIO first and then copying it to CephFS. So, the integration has to be done ASAP.