Featured image of post Self-hosted OIDC with Authentik and SvelteKit

Self-hosted OIDC with Authentik and SvelteKit

For my ongoing project Review Planner I had been relying on in-app authentication, storing every piece of user information in the application database. It works for simple authentication, but it becomes very cumbersome when you want to add more features like password reset, email verification, and so on.

There were some options like using an authentication library like Auth.js directly in the app, or using a third-party service like Firebase or Supabase. However, I chose Authentik for the following reasons:

  1. Self-hosted: I wanted to challenge myself to self-host everything
  2. Modular: the ability to swap to another provider in the future, if needed
  3. Well-documented: Authentik seemed to be pretty mature and well-documented

Prerequisites

  1. A Kubernetes cluster
  2. A domain name (I used junyi.me for this example)
  3. Default storage class set up in the cluster (For example, ceph-rbd) for Authentik’s PostgreSQL and Redis databases

Overview

This post will cover:

  1. Setting up Authentik
  2. Implementing OIDC authentication in SvelteKit for existing users

User registration, password reset, and email verification can be added later (consult Authentik documentation), which can all be handled by Authentik.

The flow will look like this:

Authentik OIDC flow

In our setup, the SvelteKit app will be the RP (Relying Party) and Authentik will be the OP (OpenID Provider).

As shown in steps 2-3, the user will be redirected to Authentik for authentication, so they will see the Authentik login page once they hit the login button in the SvelteKit app.

Set up Authentik

I used the Authentik Helm chart to deploy Authentik on my cluster, with the following configuration:

 1
 2
 3
 4
 5
 6
 7
 8
 9
10
11
12
13
14
15
16
17
18
19
20
21
22
23
24
25
26
# values.yml

authentik:
  secret_key: abc12345 # TODO: Replace with a strong secret key
  postgresql: # TODO: Replace with your PostgreSQL settings
    name: authentik
    user: authentik
    password: abc12345
postgresql:
  enabled: true
  auth: # TODO: Make sure these matches the above
    username: authentik
    database: authentik
    password: abc12345
redis:
  enabled: true
server:
  ingress:
    enabled: true
    hosts:
      - auth.junyi.me # TODO: Replace with your Authentik domain
    tls: # TODO: Replace with your TLS settings
      - hosts:
          - "*.junyi.me"
        secretName: junyi-me-production
    https: false

Make sure the secret for TLS is created in your cluster using something like cert-manager.

Create a new application in Authentik

When accessing Authentik for the first time, you will be prompted to create an admin user. After that, you can log in to the Authentik dashboard.

On https://auth.junyi.me/if/admin/#/core/applications (replace with your Authentik domain), create a new application with provider.

Create a new application

Choose OIDC provider

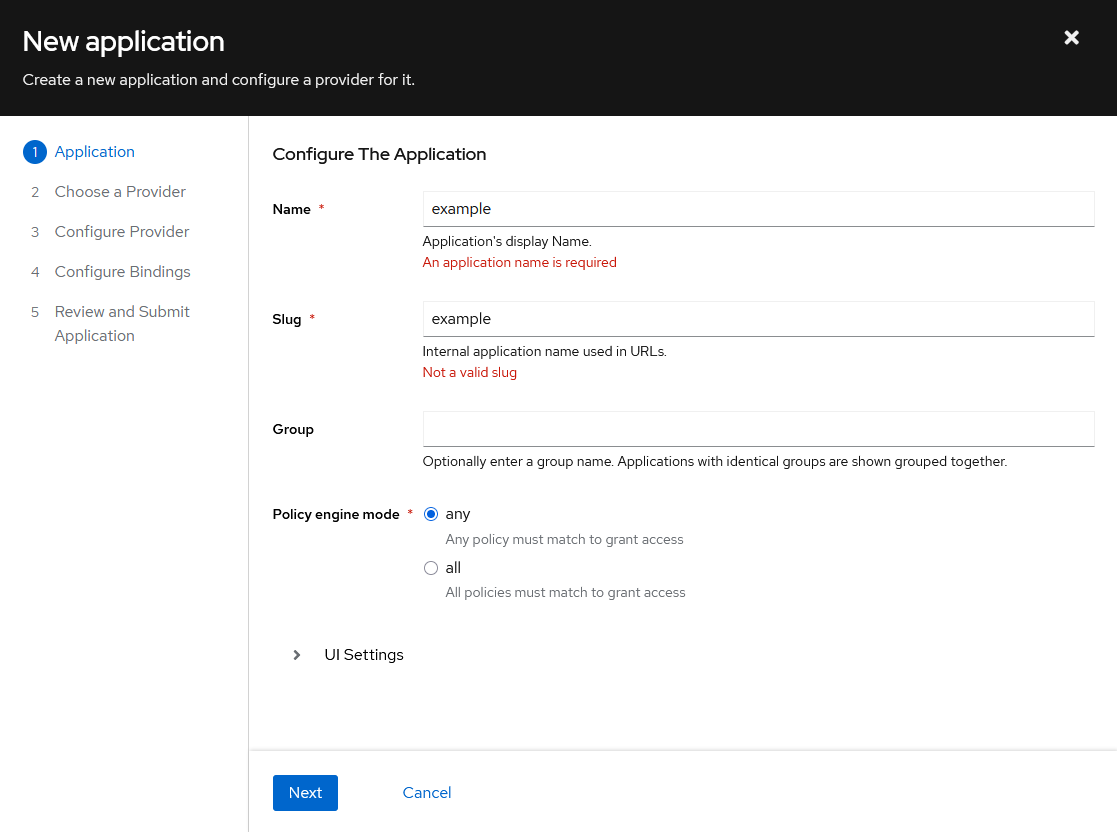
For the OIDC provider, you can use the default settings, with the following changes:

  1. Use the explicit grant type
  2. Add the offline_access scope to allow refresh tokens

Explicit offline_access scope

Once the application is created, you can see the provider details in the providers tab.

Provider details

The URLs on the right are used later to configure the SvelteKit app.

Make sure to set the Redirect URIs to your SvelteKit app’s OIDC callback URL, which is usually something like <your-app-domain>/auth/callback. We will implement this in the SvelteKit app later.

At this point, we are done setting up the Authentik OIDC provider. It’s time to move on to the application side.

SvelteKit + OIDC

For my application, I chose not to use another library for authentication. Just some fetches and cookies to get the job done.

The login flow will look like this:

  1. Create a login button that redirects to the Authentik OIDC provider
  2. Handle the OIDC callback in the SvelteKit app, then
    1. Get the access token and refresh token from the URL parameters
    2. Store the tokens in cookies
  3. Validate the access token on each request to the SvelteKit app

When the access token expires, the following happens:

  1. Backend on any route detects the expired/missing access token, and redirects user to /auth/refresh
  2. Browser automatically sends the refresh token cookie to the /auth/refresh route
  3. The /auth/refresh route exchanges the refresh token for a new access token
    1. If success, the new access token is stored in the cookie, and the user is redirected back to the original route
    2. If failed, the user is redirected to /auth/logout, which will clear the cookies and redirect the user to the main page

By automatically redirecting the user to the /auth/refresh route and redirecrting them back once refresh is done, we can provide a seamless experience for the user without being taken to different places because of expired access tokens.

Configuration

I usually keep my SvelteKit config params in environment variables, and for this project, I have the following:

 1
 2
 3
 4
 5
 6
 7
 8
 9
10
11
# .env
AUTH_ISSUER=https://auth.junyi.me/application/o/review-test/
AUTH_URL=https://auth.junyi.me/application/o/authorize/
AUTH_TOKEN_URL=https://auth.junyi.me/application/o/token/
AUTH_USER_URL=https://auth.junyi.me/application/o/userinfo/
AUTH_LOGOUT_URL=https://auth.junyi.me/application/o/review-test/end-session/
AUTH_JWKS_URL=https://auth.junyi.me/application/o/review-test/jwks/

APP_HOST=http://localhost:5173
CLIENT_ID="<redacted>"
CLIENT_SECRET="<redacted>" # Replace with your Authentik client secret

These can all be found in the Authentik application provider details page, as shown above.

Login button

For the login button, I just added a simple link on the navbar:

Login button link
1
2
3
4
5
6
7
<nav>
  {#if $loggedIn}
    <a href="/auth/logout" data-sveltekit-preload-data="off">Logout</a>
  {:else}
    <a href="/auth/login">Login</a>
  {/if}
</nav>

which links to the /auth/login route:

src/routes/auth/login/+page.server.ts
 1
 2
 3
 4
 5
 6
 7
 8
 9
10
11
12
13
import { env } from "$env/dynamic/private";
import { redirect } from "@sveltejs/kit";
import type { PageServerLoad } from "./$types";

export const load: PageServerLoad = async () => {
	const url = new URL(env.AUTH_URL);
	url.searchParams.set('client_id', env.CLIENT_ID);
	url.searchParams.set('redirect_uri', `${env.APP_HOST}/auth/callback`);
	url.searchParams.set('response_type', 'code');
	url.searchParams.set('scope', 'openid profile email offline_access');

	throw redirect(302, url.toString());
}

This will redirct the user to the Authentik login page.

Callback handler

Once the user successfully logs in, they will be redirected back to the SvelteKit app at /auth/callback with a code in the URL parameters.

This route is handled by:

rc/routes/auth/callback/+page.server.ts
 1
 2
 3
 4
 5
 6
 7
 8
 9
10
11
12
13
14
15
16
17
18
19
20
21
22
23
24
25
26
27
28
29
30
31
32
33
34
35
36
37
38
39
40
41
42
43
44
45
46
47
48
49
50
51
52
53
54
55
56
57
58
59
60
61
62
63
64
65
66
67
68
69
70
import { env } from "$env/dynamic/private";
import { setAuthCookies } from "$lib/server/cookie";
import { db } from "$lib/server/db";
import { user } from "$lib/server/db/schema";
import { eq } from "drizzle-orm";
import { json, redirect } from '@sveltejs/kit';
import type { PageServerLoad } from "./$types";
import type { UserInfo } from "$lib/api";

export const load: PageServerLoad = async ({ url, cookies }) => {
  const code = url.searchParams.get('code');
  if (!code) return json({ error: 'Missing code' }, { status: 400 });

  // Exchange code for tokens
  const resp = await fetch(env.AUTH_TOKEN_URL, {
    method: 'POST',
    headers: { 'Content-Type': 'application/x-www-form-urlencoded' },
    body: new URLSearchParams({
      grant_type: 'authorization_code',
      code,
      redirect_uri: `${env.APP_HOST}/auth/callback`,
      client_id: env.CLIENT_ID,
      client_secret: env.CLIENT_SECRET
    })
  });

  if (!resp.ok) {
    const error = await resp.json();
    console.error('Failed to exchange code for tokens:', error);
    throw redirect(302, '/'); // TODO error page
  }
  const tokenData = await resp.json();
  /*
  {
    access_token: "...",
    refresh_token: "...",
    expires_in: 3600,
    token_type: "Bearer",
    scope: "openid profile email"
  }
  */

  // get user info from access token
  const infoResp = await fetch(env.AUTH_INFO_URL, {
    headers: {
      Authorization: `Bearer ${tokenData.access_token}`
    }
  });
  if (!infoResp.ok) {
    console.error('Failed to fetch user info:', await infoResp.text());
    throw redirect(302, '/'); // TODO error page
  }
  const userData = await infoResp.json();

  // if new user, insert into database
  const users = await db.select({ id: user.id }).from(user). where(eq(user.email, userData.email));
  if (users.length === 0) {
    await db.insert(user).values({
      id: userData.sub,
      name: userData.name,
      email: userData.email,
    });
  }

  setAuthCookies(cookies, tokenData.access_token, tokenData.refresh_token, tokenData.id_token, tokenData.expires_in);
  return {
    name: userData.name,
    email: userData.email,
  } as UserInfo;
}

Here, several things happen:

  1. Get the code from the URL parameters
  2. Exchange the code for tokens by making a POST request to the token endpoint
  3. Use the access token to fetch user info from the userinfo endpoint
  4. Persist the user into the application DB, to store user-specific data in the app later
  5. Store the access token and refresh token in cookies

Authorization

For each request to a protected endpoint, a validation logic can be added:

src/hooks.server.ts
 1
 2
 3
 4
 5
 6
 7
 8
 9
10
11
12
13
14
15
16
17
18
19
20
21
22
23
24
25
import { COOKIE } from "$lib/server/cookie";
import { decodeAccessToken } from "$lib/server/jwt";
import { redirect, type Handle } from "@sveltejs/kit";

export const handle: Handle = async ({ event, resolve }) => {
  let access = event.cookies.get(COOKIE.ACCESS_TOKEN);

  // handle token refresh
  if (event.url.pathname.startsWith("/app") && !access) {
    // JSON requests: return 401 and let the client handle it
    const reqJson = event.request.headers.get("Content-Type")?.includes("application/json");
    if (reqJson) {
      return new Response(JSON.stringify({ error: "Unauthorized" }), { status: 401, headers: { "Content-Type": "application/json" } });
    }

    // Non-JSON requests: redirect to refresh endpoint
    throw redirect(302, '/auth/refresh?redirect=' + encodeURIComponent(event.url.pathname + event.url.search));
  }

  const payload = await decodeAccessToken(access!);
  // @ts-ignore
  event.locals.user = payload;

	return await resolve(event);
};

decodeAccessToken will validate the access token using the JWKS endpoint, and return the token payload if valid.

src/lib/server/jwt.ts
 1
 2
 3
 4
 5
 6
 7
 8
 9
10
11
12
13
14
15
16
17
18
19
20
21
22
23
24
25
26
27
28
29
30
31
32
33
34
35
36
import { env } from '$env/dynamic/private';
import { jwtVerify, createRemoteJWKSet } from 'jose';

const JWKS = createRemoteJWKSet(new URL(env.AUTH_JWKS_URL));

export type AccessTokenPayload = {
  iss: string;
  sub: string;
  aud: string;
  exp: number;
  iat: number;
  auth_time: number;
  acr: string;
}

export async function decodeToken(token: string) {
  if (!token) {
    return null;
  }

  try {
    const { payload } = await jwtVerify(token, JWKS, {
      issuer: env.AUTH_ISSUER,
      audience: env.CLIENT_ID,
    });

    return payload;
  } catch (err) {
    console.error('Invalid token:', err);
    return null;
  }
}

export async function decodeAccessToken(token: string): Promise<AccessTokenPayload | null> {
  return decodeToken(token) as Promise<AccessTokenPayload | null>;
}

Token refresh

The /auth/refresh route will handle the token refresh logic:

src/routes/auth/refresh/+server.ts
 1
 2
 3
 4
 5
 6
 7
 8
 9
10
11
12
13
14
15
16
17
18
19
20
21
22
23
24
25
26
27
28
29
30
31
32
33
34
35
import { env } from "$env/dynamic/private";
import { COOKIE, setAuthCookies } from "$lib/server/cookie";
import type { RequestEvent } from "../../$types";
import { redirect } from '@sveltejs/kit';

export async function GET({ request, url, cookies }: RequestEvent) {
  const refresh = cookies.get(COOKIE.REFRESH_TOKEN);
  if (!refresh) {
    return redirect(302, "/auth/logout");
  }

  const res = await fetch(env.AUTH_TOKEN_URL, {
    method: 'POST',
    headers: {
      'Content-Type': 'application/x-www-form-urlencoded'
    },
    body: new URLSearchParams({
      grant_type: 'refresh_token',
      refresh_token: refresh,
      client_id: env.CLIENT_ID,
      client_secret: env.CLIENT_SECRET,
    }),
  });

  if (!res.ok) {
    throw redirect(302, "/auth/logout");
  }
  const data = await res.json();
  setAuthCookies(cookies, data.access_token, data.refresh_token, data.id_token, data.expires_in);

  if (request.headers.get("Content-Type") === "application/json") {
    return new Response(JSON.stringify({ success: true }), { status: 200, headers: { "Content-Type": "application/json" } });
  }
  throw redirect(302, url.searchParams.get('redirect') || '/app');
}

On a successful refresh, it redirects user to the originally requested page.
If unsuccessful, it redirects user to /auth/logout, which clears the cookies and redirects user to the main page.

It also handles JSON requests, for which the retry logic can be implemented on the client side, so it simply returns a 200 response.

Logout

The logout route does two things:

  1. Call the Authentik logout endpoint to invalidate the session
  2. Clear the cookies and user data in the SvelteKit app

First, on the backend, the cookies are cleared and the logout endpoint is called:

src/routes/auth/logout/+page.server.ts
 1
 2
 3
 4
 5
 6
 7
 8
 9
10
11
12
13
14
15
16
import type { PageServerLoad } from "./$types";
import { COOKIE, deleteAuthCookies } from "$lib/server/cookie";
import { env } from "$env/dynamic/private";

export const load: PageServerLoad = async ({ cookies }) => {
  const idToken = cookies.get(COOKIE.ID_TOKEN)

  deleteAuthCookies(cookies);

  if (idToken) {
    const resp = await fetch(`${env.AUTH_LOGOUT_URL}/?id_token_hint=${idToken}`);
    if (!resp.ok) {
      console.error('Failed to log out:', await resp.text());
    }
	}
}

Then, on the frontend, user data is cleared and user is redirected to the main page:

Logout link
 1
 2
 3
 4
 5
 6
 7
 8
 9
10
11
12
<script>
  import { goto } from "$app/navigation";
  import { localUser } from "$lib/store/user.client";
  import { onMount } from "svelte";

  onMount(() => {
    localUser.set(null);
    goto("/", { replaceState: true, invalidateAll: true });
  })
</script>

<p>Logging you out...</p>
Built with Hugo
Theme Stack designed by Jimmy